Thursday, June 30, 2016

CUSTOM COMPUTER TABLE FOR THE AIRSTREAM INTERSTATE

The tables that were produced for many of the T1N Airstream Interstates are ideal if you intend to serve dinner for four.  But they are large, awkward, weigh about 20 pounds without the legs, and are not very practical for streamlined applications including computer work.
Here's one of the photos from the original sales listing for our rig.  Big, big table.  
So I decided to replace it with something much more efficient and purpose-built.  This blog post describes that process.
Here's another view of the original table, this time positioned bottom side up, beside a cardboard mock-up of my target design.  I don't use a rinky-dink little laptop or pad computer - I have a full engineering "mobile workstation" that I haul almost everywhere I go.  Therefore the table had to be designed around it. 
In order to get the leg flange spacing correct in my cardboard mock-up, I simply placed the cardboard on top of the existing table and stepped on it creating flange impressions that I could then trace, heh heh.  
A table replaced in an Airstream should be made of what, exactly?  Solid aluminum, natch.
I picked a perforated aluminum sheet product, which I ordered in the size I needed for my specific application, which was 28" x 16".    
I ordered from Online Metals which gave excellent service and quick delivery (my total was $88 which included the sheet in massively-protected packaging, plus shipping).  The exact description of the product I ordered is as follows, and this is important for consistency with the hardware sizing that will be described below (the vendor sells several different specs of perforated product):

0.125" (0.25" holes-0.375" STAGGER) ALUMINUM PERFORATED SHEET 3003-H14

Eighth-inch sheet is not very thick and will bend if abused, but my table was not going to be very large and furthermore, it would have two pedestal legs with wide flanges.  For that reason, I didn't think heavier aluminum would be necessary.  The piece as cut weighs about 3 pounds, which is a far cry from the 20 pound OEM table that preceded it.

Here are some pics of the put-together, including hardware references.
The perforated sheet arrived perfectly cut, but I had to edge it myself (the factory-cut edges were razor sharp; even before edging them, I had to file them down a bit).  That proved to be a challenge because my preferred edging material, which is 0.125 inch opening U-channel aluminum, is not really produced in the market (omitting long story).  I could have perhaps gotten some adequately-sized J-channel and epoxied it around the edges of this sheet, but in the end I went with polypropylene belt webbing from Joann Fabrics.  They don't seem to have it listed on the internet, but it's the kind of webbing you would literally make a thin belt with.  I stitched it into place using a tapestry needle and some embroidery floss of exactly the same shade of gray so that the stitching would not be noticeable.  The stitching process took as much time as two episodes of Law and Order with fast-forwarded commercials.  Cost was about seven bucks for all materials (be sure to use those Joann coupons that you can fetch on your phone).

The webbing looks darker than it really is in this photo because of the lighting.  You'll see truer-to-life photos below.  
Here's the beauty of using this particular perforated aluminum sheet product:  The holes are spaced such that they can be made to align with the holes in the Airstream OEM flanges, at least the flanges used on our T1N Interstate table.  Furthermore those holes are exactly the same size.  Therefore, no drilling or other modification of the perforated sheet was necessary.  Here you can see light shining through three holes on the right side.  The left side of the photo is overpowered by the glare.  
Tap photo to expand for clarity - Here's two of three types of hardware that I chose (I messed up this photo by placing hex nut packages twice; the third piece of hardware, which is the little locking washers, will be shown below).  Some young man named Justin, a CSR in the League City Lowes hardware store, helped me tremendously to narrow down what would work best for this application.  He suggested using stainless steel for an upscale look, and hex button caps in particular because they don't look like regular plain construction bolts.  So Justin gets major artistic credit on this project.  
Here is what the hex bolts look like when inserted.  Notice how I'm also reversing the order of nut-washer-bolt relative to what Airstream had originally done.  They screwed from beneath, to to speak, because their table top was solid.  Mine is perforated, so I need the prettier bolt heads to show at the top.  The top is a little bit lumpy either way, whether it's bolt-up or bolt-down, but this is a computer table and I'll be incorporating a shock pad (shown below), so that does not matter.  
For the actual positioning of the flanges on the perforated sheet, what I did was mark the approximate centers of where they ought to be using masking tape, and then I kind of "massaged the sheet around" until it found what seemed to be the best location relative to the other parts.

In other words, I put the pedestals in the floor, I put the flanges on the pedestals, and then I positioned the sheet on top and scooted it around until the alignment made the most sense.  The holes do line up, but not on the square, so this process is a bit subjective.  You just have to make sure that it makes sense for your application.  For instance if you wanted to use this type of table for general purposes and you had people of different sizes, perhaps husband and wife, maybe you'd want to set the flanges off-center so that the larger person would have more room.  With perforated aluminum, the possibilities are endless and you can change your mind later on and just move things around.  

Here, too, is the third piece of hardware I mentioned - lock washers, because the table will be subject to vibration and I don't want the flanges working their way loose.  
In every great blog post, there must be a money shot, and here it is, in all of its industrial chic glory:
For less than a hundred bucks, I've got a table that is as practical as it is stunning.  Incidentally, that pic of the bison on the computer was taken during our last major trip, so it's only a propos that I show that image as we are getting ready for our next major trip.  This table creation was part of our make-ready process.

See now how the belt webbing around the edge blends in?  I like it - thematically it works for a vehicle because it's reminiscent of seat belt webbing.  Plus I ended up concluding that I wanted something of a textile nature on the table instead of the entire assembly being 100% cold metal.  I've already bumped into this table several times.  The polypro webbing is good for sliding over the legs that come into contact with it.  
There are a few additional things to note about the details of this table.
Number one, you will notice that I've got Velcro keeper straps holding the computer down.  This is because I don't want to have to worry about the computer if I'm working while the vehicle is in motion.  Notice how my Velcro is held in place with the same hex bolts running through the table top.  Notice also that I'm not blocking the computer's ventilation holes with the strap.  Particularly if I close the cover with this Velcro strap in place, that computer is not going anywhere unless a major accident occurs.  It is held very tight to the table this way.

The beauty of having a Velcro strap like this is that it can be moved around as needed.  Just re-position the hardware in the perforated aluminum.  Get a different computer?  New size?  Second monitor?  Just move the straps and re-bolt in place.  Simple.  
Number two, you'll also notice that I have a piece of convoluted foam (aka "egg crate foam") beneath this computer for use as a shock pad.  That is because, several years ago, I lost my primary business machine to a drop sensor corruption.  I'm not a casual computer user - I run a small business off that one souped-up mobile workstation that you see here.  Every high-end laptop contains a drop sensor designed to protect the hard disk(s) in the event of a fall, and it does so by instantly locking the disk(s) in place to prevent impact damage.  Well, if the damned sensor malfunctions, then the computer freezes during normal use and essentially bricks!  Rough treatment produces wear and tear on drop sensors, and rough treatment is part and parcel of the rear end of an Airstream Interstate.  Therefore I have protected the computer against acute shocks (think major pot-holes) by setting it on this foam.  Which, incidentally, also helps keep it from sliding around.

Now a word on storage practicalities.
This little buddy is so much easier to store than the OEM Airstream table!  Here is a view of the underside.  Notice how short the bolts are that hold on the flanges (per the hardware specs given above).  You don't want to scoot your thighs under this table and have long bolts gash your skin.  Therefore the bolt ends and their corresponding washers and nuts are very short and almost flush with the bottom of the flanges.    
You must admit, that is a thing of sheer Class B beauty and efficiency.  Notice how the computer keeper straps also hold the convoluted foam base and mouse pad for storage.  
As for the storage itself, the table is so small that there are several possibilities even within the tiny space of the Airstream Interstate.
For the short term, I'm thinking of storing it in the closet, with a few more Velcro pieces to hold everything in position.  
I couldn't be happier with this project, nor could I be happier that finally I was able to execute something that I vitally need without my over-worked husband having to lay a finger on it.  This project was all on me, thank goodness!!  Stay tuned for more of my husband's absolutely unprecedented creative work where our Interstate is concerned, work which will be the subject of near-future posts.

Edit 20180510:  I made two changes to the table following this blog post. 

First, I adapted it to also function as a Lagun table top, such that I can use it with both mounts - the original twin pedestals and the Lagun mount.  You can read about the Lagun project here

Second, I rounded the corners!!!  Sometimes we don't get things exactly right on the first attempt.  Sometimes we have to iterate.  Why did I leave them square in the first place?  Probably because at the time, I wasn't sure that we could cut aluminum as cleanly as we would need to do, but my fears were unfounded (in other words, a jigsaw in the hands of my husband proved me wrong).  Here's a pic of the revised table, the shape of which now closely mirrors the Airstream signature window in our rig's galley kitchen.
Even better, especially given my more dynamic use of it, in which I squeeze in and out of the passenger seat with it in place (hence having no corners to catch my clothing on is an improvement). 

Sunday, June 19, 2016

STORING REFLECTIX SHADES IN THE AIRSTREAM INTERSTATE

In this previous post, I talked about cutting Reflectix inserts for our Airstream Interstate windows.  Upon verifying that they assist with heat control as well as providing a black-out method during stealth camping, I decided to keep them permanently in the vehicle.  That being the case, I needed a method for storing all of them, and stacking them on top of the fresh water tank was not cutting it.  It worked, but (a) I want to use that space for other things, and (b) there was too much awkward rummaging every time I had to dig a specific piece out.  I am not a fan of rummaging.

Inspired by Instagrammer @wheninvan, a Sprinter DIYer who appears to have used Reflectix exclusively for window coverings (not just for inserts, and his looked surprisingly good), I simply did what I had originally done for our windshield cover - I inserted Velcro strips behind key finishing screws in the interior, and used them to secure the rolled up Reflectix covers, as follows.
Here is one such screw securing a trim piece adjacent to the port side rear door.  
Use an awl or similar tool to poke a hole in the Velcro piece. 
Unscrew, insert Velcro, replace screw and its plastic finishing cap.  
And here's the result of following this procedure for the rear door and side windows.
I think it looks cool!  Almost like decor.  It certainly matches the style of the Interstate.  Initially I thought that this might end up looking too cluttered, but I like it. 
For the galley window and sliding door window, I took a slightly different approach because there were no convenient trim piece screw attachments near those.
I put an adhesive-backed patch of Velcro on the strips that cinched the Reflectix into a roll...

...and stuck them above the head-knocker that lines the top of the sliding door.  You can see the original large windshield reflector by Heatshield on the ceiling at photo left.  At that location, there were convenient screws in the joinery between the cab liner and the aluminum inner finish.  
Not only is this convenient, it maintains the corresponding Reflectix insert right next to the corresponding window.  The whole time I was doing this project, I was reminded of the 1995 Meg Ryan movie "French Kiss" where she says, "Use the corresponding face for the corresponding emotion."  For as long as these pieces were all stacked on top of the fresh water tank, it was always a pain to figure out which piece of Reflectix was supposed to correspond to which window, because the Velcro dots on each Reflectix only match to the windows one way.  Problem now solved.
Of course, I would not blame you if you did not recognize the "corresponding face" line.  It certainly was not the most famous line to originate with a Meg Ryan movie.  

Sunday, June 12, 2016

SIDE WINDOW SHROUD FOR THE AIRSTREAM INTERSTATE

"IT'S NOT THE AMBIENT TEMPERATURE - IT'S THE INCIDENT ENERGY!" a residential window salesman bellowed at me authoritatively one day many years ago.  I did not buy any energy-efficient windows from him that day, but he was correct.  What he meant was that most of the heat gain experienced in an interior space derives from the surface heating imparted by direct sunlight, rather from the temperature of the surrounding air.

And so it is as well with our Airstream Interstate.  Those big, beautiful black-masked windows become one hellacious heat sink on a hot Houston day.
No danger of something like this happening to our Interstate windows.  In southern summer conditions of direct sun, they literally become too hot to touch.  
A few weeks ago, I noticed that the Park N Ride buses running between League City and University of Texas Medical Branch (UTMB) in Galveston have had their windows completely masked with white vinyl, the kind of that have all those little holes in them so that you can still see out.  "Perforated mesh", they call it, and it's used for heat control.

Anyway, seeing those buses and also reading about Air Forums trailer owners painting their roofs with white elastomeric to slow heat gain... these things prompted me to tackle this little project in which I adapted a white nylon lining fabric into a shroud that can be put in place only when it is needed, which tends to be whenever the sun is broad-siding the vehicle as it is parked in an area where I am unable to turn nose-into the sun (which minimizes heat gain if one is able to accomplish it).  Given that the fiercest portion of the sun is only ever going to hit one side at a time, I made just one shroud.  My general approach went like this.
The cashier in Hancock Fabrics looked at me like I was a bit nuts for buying all that remained on a bolt of this stuff.  "How is it to sew?" she asked dubiously.  I told her that it sucks - it's uncooperative and slippery - but that I had no other choice for my application.

The window bank is about 14 feet long.  Rather than measuring precisely, I prefer to do these kinds of projects as fit-in-place, step-by-step.  So I initially fit it roughly like this to establish gross dimensions...
...and then lined it up on the tile floor of our great room to cut it down to size.
Once I had the top hem sewn, I taped the finished top edge in place and used the floor as a square guide for hemming the bottom edge.  This was more efficient than trying to impose quantitative measurements on fourteen feet of slippery, biased fabric.  
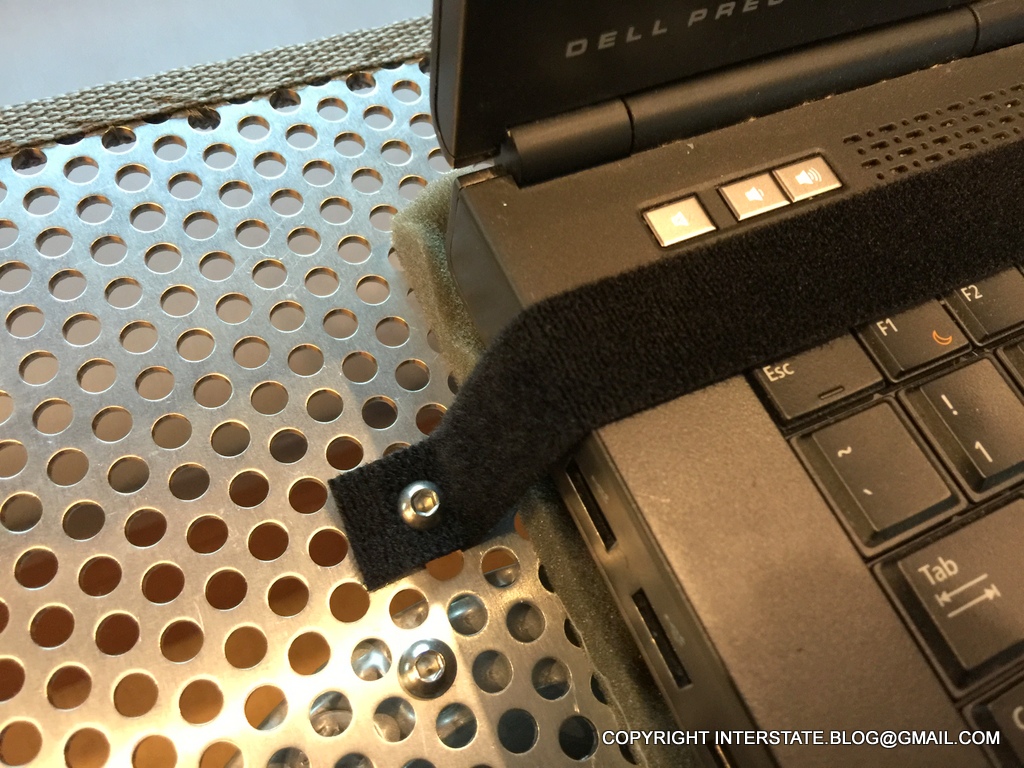
Now, a word about the neodymium magnets that I embedded in the edges of this thing (six along the top edge, six along the bottom).
No kidding.  We order them from the internet, and stuff like this really happens.  
These magnets are difficult to work with and if not managed properly, they will make your life miserable.  They Have One Job - to stick to whatever they can.  This includes the footer of my sewing machine, pins, scissors, and needles.  And the ironing board.  And the lamp.  And my belt buckle.  My watch band.  The dog's collar rivets.  The list is endless.
The neodymium magnet I prefer for this type of application is 8 mm x 4 mm.  Any larger than that and it becomes too difficult to break its mighty hold.  Any thinner than that and they shatter too easily, because they are brittle.  
I ended up having to insert the neodymiums into the top and bottom hems of the shroud as I was pushing the piece through my Singer, but due to the impressive forces they generate, I had to hand-sew each little pocket to keep them in their respective places.

And here is the result.
"It doesn't look as bad as I expected it to," my husband remarked.  My sweetie.  So much confidence in me.  
I had gotten that windshield cover some time ago from a Sprinter supplier - from one of the usual suspects.  It is both reflective on its outer surface and fleece-lined on the inner surface.  It works well but it is correspondingly bulky - about the size of a small blanket when folded up.  I wanted a much thinner side shroud because I probably won't use it as often - only when the sun is at its most brutal.  Therefore I was going for maximum bang for minimum buck, and in this case that translated into lowest possible mass and volume.
It folds down to about the size of a large ham sandwich and weighs about a pound.  Total construction cost was about 25 bucks, of which almost all was the cost of the 12 neodymiums.  
To avoid a neodymium nightmare, I quickly figured out that donning and doffing the shroud needs to be undertaken systematically.
I sewed in the neodymiums in the upper and lower hems directly above and below each other, and the best way to fold this shroud is to pick up the end pair of magnets, and fold them over to match up with the second pair down.  Then take what becomes the new end pair, and fold them over to align with the second pair down... oh, geez, this doesn't translate into English well at all...
Does this help?? Take the end pair of magnets, and fold into the second ones down, and so on. 
As you continue to fold, you should end up with something that looks like this:
So happy together - all the neos in their pockets are neatly together, and now this shroud can be slipped into a zip lock bag or some other container. Rather than having them clinging crazily to each other in a great uncontrolled neodymium cluster-freak.  
Anyway, that's my shroud story and I'm sticking to it.  Ferociously, like a neodymium magnet.

Update 20160615:  Augh, pound my head on my desk... Quite by accident, I found this surprisingly good quality metalized fabric at the Hancock Fabrics' close-out sale (they are popular in our area but are going out of business).
When what to my wondering eyes did appear... 
Historically, fabrics of this type have been novelty offerings such as one might use to create party clothing, not very durable but very expensive. In stark contrast, this was $2.79 a yard on close-out.  Technology has come a long way - this is quite strong and as light as crepe silk - potentially perfect for this application.  If I knew then what I knew now, I'd probably make my shroud out of this, betting that it would reflect even more energy than white polyester.  As it stands, I may use it to re-make the shroud because I'm quite curious about how it would perform.  Not that I care to hand-stitch 12 little neodymium pockets all over again, but I'm curious.

Moral of the story - check the store thoroughly before making a purchase decision.

Update 20160619:  I couldn't stand it - I had to do it.  I did an overlay sew of the metallized fabric on top of the thin polyester shroud.  It certainly looks better - a better match to the windshield cover.  How it will stand up I don't know, but it only cost me about $13 and some time to try this.  You can tell that this is not high-dollar fabric - it had some tension issues during production.  But as long as it works, that's not a concern to me.

OMG it's hot here now.  I set my iPhone down to add this shroud to the window after I finished the sew job, and by the time I got done, the iPhone was almost too hot to pick back up again.
It's got a bump toward the rear because when placed on this side of the van, it has to stretch over the porch light.